Macintosh Users should be aware that there are two different TCP/IP systems available for Macintosh at this time. The older system was MacTCP which was available for non-PowerPC type Macintosh Computers. The more modern version of MacTCP is OpenTransport TCP/IP.
The first step is to determine if you have MacTCP or Open Transport TCP/IP.
Macintosh Users with MacTCP can use a smart freeware tool called MacTCP Switcher to manage their IP Configurations between campuses.
The first step is to obtain the MacTCP Switcher software. It is available from FTP or from the Chooser menu, off of the Helpdesk Server. Once you have it, follow the steps in the next section to save configurations for Murdoch and Rockingham campuses.
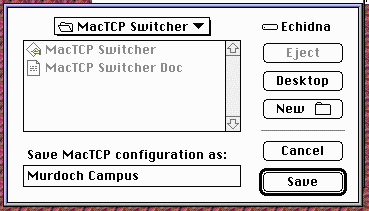
Go to Apple Menu Items, Control Panels, MacTCP. Set your Murdoch Campus settings. (If you do not know how to, or do not know the information, please contact your IT Support Person for assistance). Once you have the settings all correct for your Murdoch Campus Configuration, close MacTCP Control Panel, and run the MacTCP Switcher program. It should come up with a window like this:
In the "Save MacTCP configuration as" box, type Murdoch Campus (as in the image above). Select "Save". This will save a MacTCP Switcher configuration file with all the settings that your Macintosh required for Murdoch Campus. The file is saved into the default folder where MacTacp Switcher program is executed from.
Similar to the Murdoch setup above, open the MacTCP Control Panel again, and now configure your TCP/IP settings for the Rockingham Campus. (As before, if you do not know all the information, contact your IT Support Person for assistance.) Once the MacTCP is configured for the Rockingham setup, close MacTCP Control Panel.
Open MacTCP Switcher Program, and type in "Rockingham Campus" this time, then select "Save".
To set your TCP/IP correctly for the campus you are on, open the folder where you have the MacTCP Switcher software and simply double click the appropriate file (either the Murdoch Campus or Rockingham Campus file). The MacTCP Switcher program will launch the following dialog box: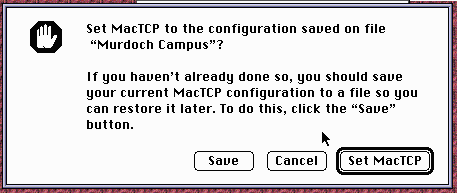
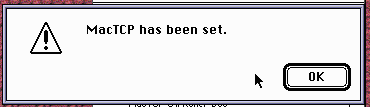
Hit the "Set MacTCP" button, and your MacTCP will be reconfigured. You will see the following acknowledgment if all goes well.
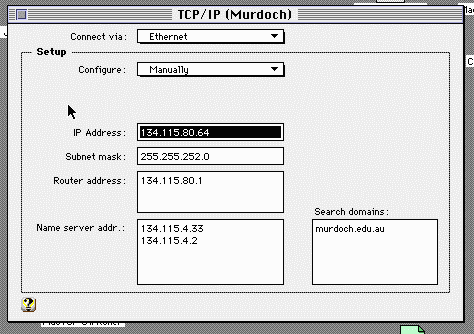
OpenTransport Macintosh Users have a built-in facility for TCP/IP Switching. To use this facility, select Control Panel, TCP/IP. You should see the following screen
To use the built in TCP/IP Switching, select File, Configuration ( Apple Key - K ) and you should see a screen similar to the following.
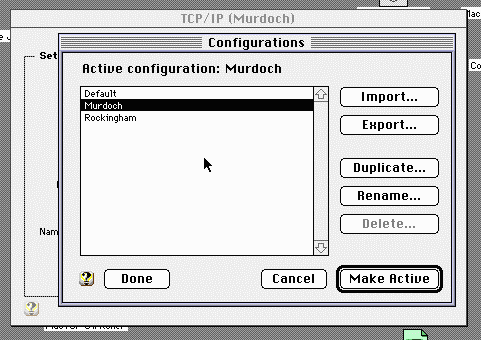
Your "Active Configuration" should be set to Default.
At this time, you need to create a Rockingham and Murdoch configurations. Select the "Duplicate" button, and type in Murdoch. Do this again, but type Rockingham.
You should now make sure the IP number, gateway and machine name are set for each option. Select the newly created Murdoch option, and select the "Make Active" button. Now select "Done", and configure the TCP/IP options screen to your Murdoch Campus IP settings. (Note, your IT Support Person in your school should be able to assist you if you do not know these details.)
Return to the configuration screen, (File - Configurations, Apple Key - K ) and select Rockingham, select "Make Active" and then select "Done". Configure the TCP/IP options screen for your setup on the Rockingham Campus. (Once again, ask your IT Support Person to help you if you do not know all the details)
Now once again, go back into the configurations screen, and select the option for the campus you are currently connected to. If you are at the South Street campus of Murdoch University, select Murdoch, otherwise select the Rockingham option. Once you have made the right selection, click "Make Active" and then "Done". Close the TCP/IP Configuration screen.
Your Macintosh should now be using the IP settings for the appropriate campus.
When you have to move to the other campus to do some work, select from the Apple Menu Items, Control Panels, TCP/IP. Select File - Configurations (Apple Key - K) . You should then see your options for Murdoch Campus or Rockingham Campus. Select the campus you are at or about to be using, then select "Make Active" and select "Done". Close TCP/IP Control Panel, and now you are set to use the correct TCP/IP settings for the campus you are on.
Enquires to: comshelp
Disclaimer & Copyright Notice © 1997 Murdoch University